Skip to content

How to Get Reimbursed for Lost Inbound FBA Inventory | Step by step

amazon fba lost inbound inventory reimbursement

FBA sellers, if you have lost inbound FBA inventory when you send stock to Amazon FCs and don’t know how to get reimbursement for lost items, I’m showing you how to do it below.

I recommend you save this article for your future reference.

Before checking out the steps, here are a few things you might want to note down:

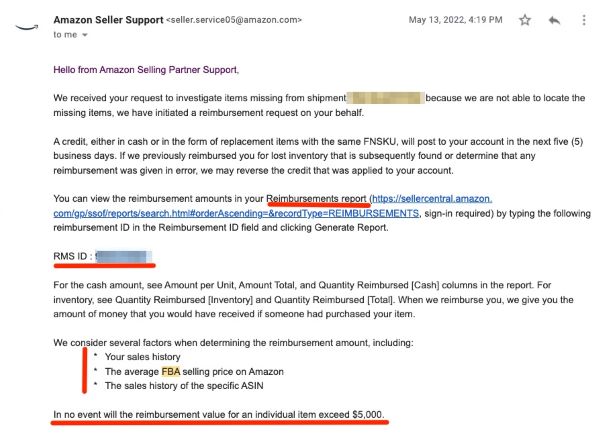
✅ This process works for reimbursement value per item under 5,000 USD.

✅ The reimbursement amount will be based on your product’s average selling price in the last 18 months and your current list price, less Amazon fulfilment fee & referral fee.

✅ So basically, the reimbursement amount will equal your Net Revenue after Amazon fees. In other words, you’ll sell all lost items at once without any advertising costs. 

Every cloud has a silver lining. 🙂 

✅ It may take up to 60 days for Amazon to process your reimbursement request. All of my requests have taken less than 30 days to be resolved. Once you submit the request, your job is pretty much done, the ball is now in Amazon’s court.

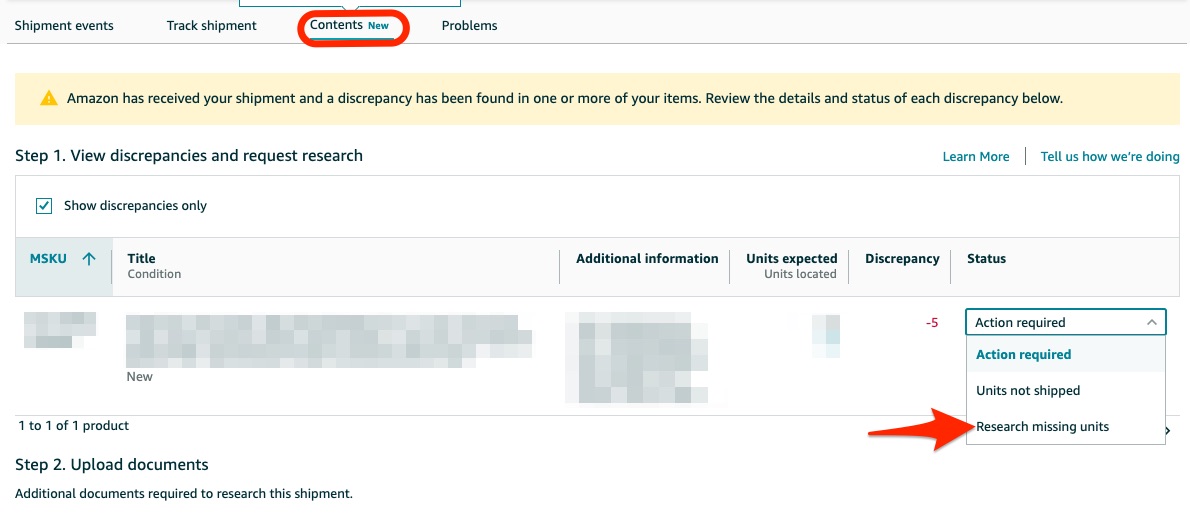
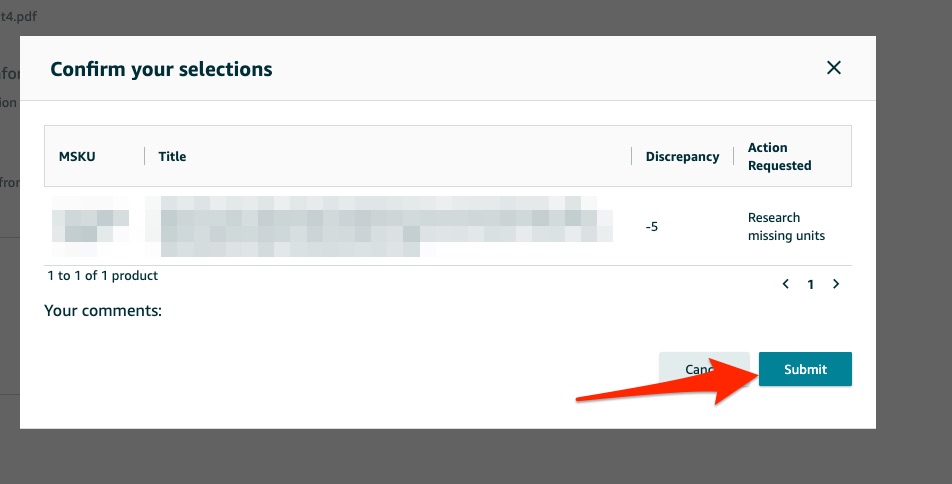
✅ As soon as the shipment status is ‘closed’, you should check the ‘Units received’ quantity if it matches your shipment quantity.

If there is a discrepancy, here are the steps of how to get reimbursement for your lost inbound inventory:

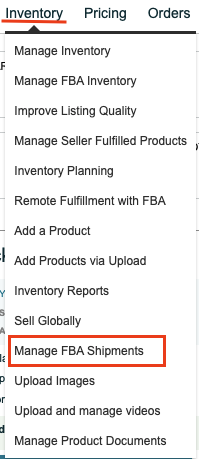
Step 1. Go to ‘Manage FBA Shipments’ under ‘Inventory’ drop-down menu

Manage fba shipments reimbursed lost inventory
Image source: Ngoc Truong

Step 2. Go to the shipment of your target and click in ‘Track Shipment’

track shipment how to get reimbursed lost inventory
Image source: Ngoc Truong

Step 3. Go to ‘Content’ tab and click in ‘Action Required’ dropdown menu on the right of the screen

Step 4. Choose ‘Research Missing Units’

research missing units lost inbound inventory FBA
Image source: Ngoc Truong

Step 5. Scroll down the page and go to ‘Step 2. Upload documents’.

Click in ‘Choose file’ button and you just need to upload ONE document: the Invoice of the product that you got from your Supplier.

Step 6. Click in “Upload file” button. Note that the invoice should be in required formats as shown on the screen, such as PDF or jpg.

upload documents reimbursed lost inbound inventory FBA
Image source: Ngoc Truong

Step 7. Scroll down more through the page, you can skip ‘Step 3. Provide additional information’. Click in ‘Preview your request’ button.

preview request lost inbound inventory reimbursement submission
Image source: Ngoc Truong

Step 8. A popup ‘Confirm your selections’ will be shown on the screen, click “Submit”. And it’s done!

submit reimbursement request lost inbound inventory FBA
Image source: Ngoc Truong

Approval

Once Amazon approves your claim, they’ll send you an email notifying you that a credit will be sent to your account in the next 5 business days.

Also, they give a link to the Reimbursement report with the Reimbursement ID so you can check the reimbursement amount there.

Once you click in the link in the email, go to ‘Reimbursements’ under ‘Payments’ tab.

amazon email reimbursed lost inbound inventory FBA
Image source: Ngoc Truong

Bonus tip

Two things on the Invoice that you should have:

a) The date of the invoice has to be prior to the date of your shipment.

b) The Buyer’s name (and address if any) on the invoice should match those of your Legal entity on your Amazon seller account.

I hope this article will save you some headache.

Have you ever had lost inbound inventory? What did you do?

Related tips about how to use Amazon Courtesy Refund feature.

Click here to learn more about Amazon’s new free SEO tool for brand owners.

Leave a Reply

Your email address will not be published. Required fields are marked *